
Moorwing Boss Guide (How to Beat or Skip)
Moorwing is an annoying flying boss in Greymoor that many players consider one of the toughest fights in Act 1. Its high damage and constant movement make it a real challenge. But don’t worry, this guide will show you not only how to beat it, but how to get help, how to skip the fight entirely, and even how to “cheese” it.
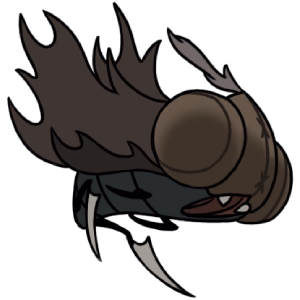
Moorwing
Location: Greymoor (Act 1 & 2)
Rewards: Access to Bellhart

Where to Find Moorwing
Section titled “Where to Find Moorwing”Where and when you encounter this boss is important, as it determines if the fight is mandatory.
Act 1 Location (Conditional)
Section titled “Act 1 Location (Conditional)”In Act 1, Moorwing is found at the edge of Greymoor, in the area just before Bellhart. Important Note: If you have already completed the “Lost Flea” quest before reaching this area, Moorwing will not spawn, and you will skip the fight.
Act 2 Location (Optional)
Section titled “Act 2 Location (Optional)”If you didn’t fight it in Act 1, Moorwing returns to Greymoor in Act 2. This time, it appears west of the “Halfway Home” bench. At this point, the fight is completely optional and doesn’t affect the story.
How to Skip Moorwing (Act 1 Only)
Section titled “How to Skip Moorwing (Act 1 Only)”Don’t feel like dealing with this boss at all? Understandable. There’s a way to bypass the fight completely.
- Start “The Lost Fleas” Quest Pick up the quest from the Flea Caravan in The Marrow.
- Find 5 Lost Fleas Locate 5 of the lost fleas in Greymoor and the surrounding areas. (For detailed locations, you can check our Lost Fleas Quest Guide.)
- Return to the Caravan When you return the 5 fleas to the caravan, you’ll be given the option to travel with them. Accept the offer.
- Skip the Fight The caravan will take you directly to Greymoor, parking right in the middle of Moorwing’s arena. Since the caravan is there, Moorwing cannot spawn, and you can proceed directly to Bellhart.
How to Get Help (Garmond & Zaza)
Section titled “How to Get Help (Garmond & Zaza)”If you don’t want to take on this tough fight alone, you can recruit the NPC duo Garmond and Zaza to help you.
- Find the Duo Locate Garmond and Zaza in one of the rooms west of Greymoor and speak with them.
- Encounter Moorwing Go to the boss arena. You just need to trigger the fight once. You can die or flee immediately after it starts.
- Report Back Return to the room where Garmond and Zaza were and inform them of the boss’s location.
- Recruit Them After this conversation, the duo will move to the entrance of the boss arena. Speak with them one last time to ask for their help. They will join you on your next attempt.
Quick Runback to Moorwing
Section titled “Quick Runback to Moorwing”The closest bench is at “Halfway Home,” where Creige and Nuu are located.
- The Path: Head west (left) from the bench. Continue until you reach the area with platforms hanging from thick chains. Drop into the opening on the left side and continue left to reach Moorwing’s arena.
Loadouts & Preparation
Section titled “Loadouts & Preparation”Gear that provides mobility and good area coverage is your best bet for this fight.
- Crest: Reaper Crest - This is the top choice for this fight. Its circular downward attack (which replaces pogo) has a wide arc that is perfect for hitting Moorwing’s entire body during its dives.
- Tool: Sting Shard - Moorwing’s body is large, so if you place this trap nearby, it will take the full area-of-effect (AoE) damage. It’s great to use while the boss is charging up another attack.
- Ability: Silkspear - Useful for poking from a safe distance.
How to Beat Moorwing (Step-by-Step)
Section titled “How to Beat Moorwing (Step-by-Step)”-
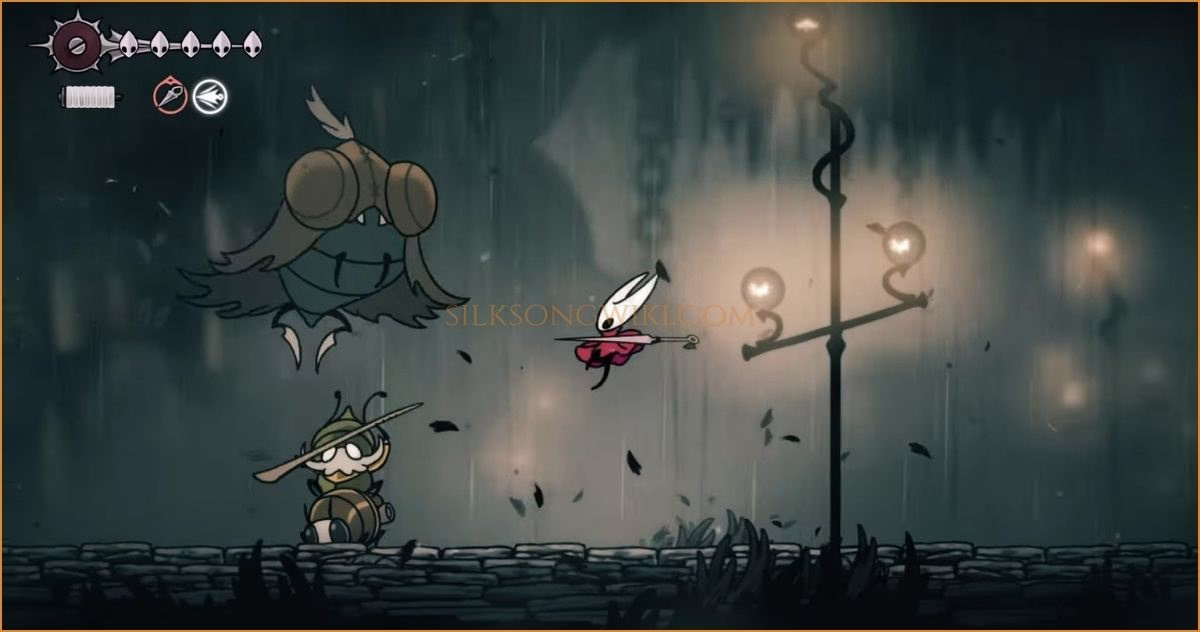
Punish the Dive Bomb Your safest and most consistent chance to deal damage is when Moorwing dives at you. Jump over it and use a downward pogo attack on its back as it passes. The Reaper Crest makes this much easier with its wide, sweeping attack. This is your main opening.
-
Dodge the Claw Lunge When you see Moorwing pull back slightly, that’s the signal for its high-damage lunge. Don’t get greedy trying to land a hit—just dash away immediately.
-
Dodge the Circular Sawblades If you see Moorwing flip upside down, it’s about to start its big AoE attack. Your best move is to sprint to the far right of the arena, near the water’s edge. The sawblades will land safely in the water and won’t hit you.

-
Stay Patient in Phase 2 After Moorwing roars, the fight gets tougher. It will start adding follow-ups to its attacks, like a second projectile after the first. Your core strategy doesn’t need to change. Play defensively, wait for the Dive Bomb, and punish that specific, safe opening.
Attack Patterns & Counters
Section titled “Attack Patterns & Counters”Here’s a quick rundown of Moorwing’s main moves.
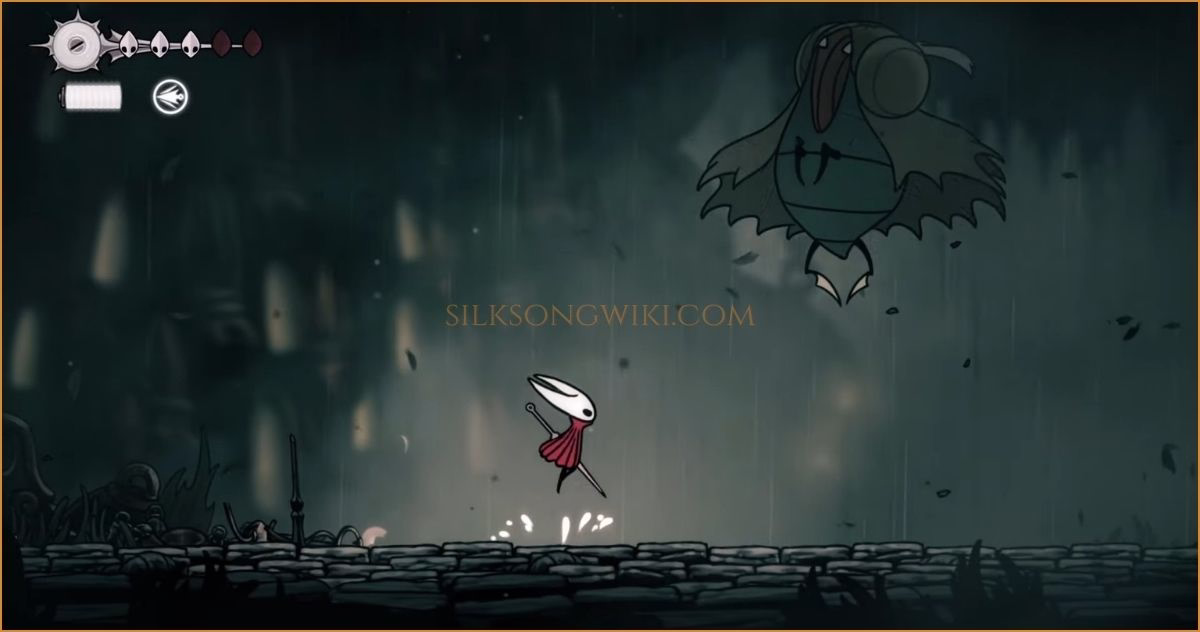
Moorwing swoops down from one side of the arena and flies quickly towards you.
Counter: Jump over it and pogo on its back as it passes underneath. This is your most reliable time to deal damage.
Moorwing gets close, pulls back slightly or opens its mouth, then lunges forward with its claws.
Counter: This is tough to dodge. Dashing away as soon as you see the “pull back” animation is the safest option. Trying to attack is risky.
Moorwing forms a projectile (orb/saw/talon) in its claws and shoots it across the ground at you. In Phase 2, it usually shoots two.
Counter: Simply jump over it. Be ready for a second projectile in the second phase of the fight.
The boss flips upside down in the air, then launches two saw blades that travel in a large circular path around the arena.
Counter: When you see it flip, either run out of the range completely or run to the far right edge of the arena by the water. The saws will fall into the water without harming you.
How to Cheese Moorwing
Section titled “How to Cheese Moorwing”If you’re tired of fighting fairly, there’s a well-known exploit to defeat Moorwing with minimal risk.
- Equip the Reaper Crest. This is required for the cheese to work because of its unique downward attack.
- Start the Fight and Reposition. Trigger the boss fight as normal, then immediately use the wind current on the right to jump back up to the entrance platform.
- Lure the Boss. Wait for Moorwing to fly up to your level to follow you.
- Attack Through the Floor. Stand on the left edge of the platform (right above the gap below) and repeatedly use the Reaper Crest’s downward circular attack. You will be able to hit Moorwing through the floor, but it won’t be able to hit you back.
Moorwing Rewards
Section titled “Moorwing Rewards”- Reward: Defeating Moorwing doesn’t grant a direct item or skill, but in Act 1, it opens the path to Bellhart and allows you to progress in “The Threadspun Town” quest.