
Last Judge Boss Guide (How to Beat)
The Last Judge is a major boss in Hollow Knight: Silksong, serving as the final guardian of the path to the Citadel and the final boss of Act 1. Wielding a massive bell as a flail, this boss tests the player’s endurance and ability to adapt to a fight that grows increasingly faster and more dangerous.

The Last Judge
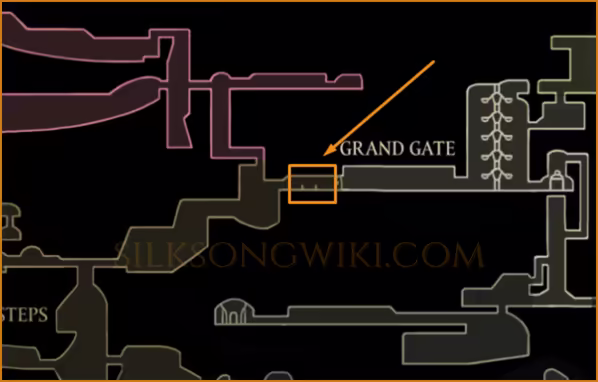
Location: Blasted Steps - Grand Gate
Rewards: Access to the Citadel

Where to Find the Last Judge
Section titled “Where to Find the Last Judge”The Last Judge is found at the easternmost point of the Blasted Steps, guarding the Grand Gate that leads to the Citadel.
To summon the boss, you must first complete the “Grand Gate” quest. After speaking to two Pilgrims near the gate, you will be tasked with finding and resting at all benches marked with bells across various areas. Once all bell-benches are activated, return to the gate and play the Needolin to challenge the Last Judge.
Quick Runback to Last Judge
Section titled “Quick Runback to Last Judge”The closest bench is near the Bell Beast. Each attempt requires a challenging climb. Here is the fastest and safest route to get back to the boss arena:
-
Initial Dash From the bench, head east (right). The area will open up. Your goal is to ignore the enemies. Run and jump past the initial obstacles, then leap to a platform on the left.
-
First Ascent with Bells From this platform, perform a dash-jump to the right across a series of hanging bells. Pogo on them to maintain your height and momentum. Climb up to reach a large open area with a statue of a bug warrior.
-
Climb and Wall Hop Stand near the statue and look for more bells to the left. Pogo on these bells and use a wall hop (wall jump) to reach the platform in the upper right.
-
Final Glide and Platforming From here, jump across another bell and perform one final wall jump. This will give you enough height to glide all the way across to the right, landing you directly on the platform in front of the Grand Gate where the fight begins.
Mastering the Run Back (Player Tips)
Section titled “Mastering the Run Back (Player Tips)”As seen in community, many players find the run back to the Last Judge to be the most frustrating part of the encounter. However, with the right strategy, it can be done in under a minute. Here are key tips from veteran players:
- Speed is Your Weapon: Do not stop to fight. The path is designed as a parkour challenge. Hold the sprint button and use dash-jumps to outrun enemies before they can fully react. Think of it as a speedrun, not a combat gauntlet.
- Countering the First Enemy: The first bug that drops from the ceiling is notoriously difficult. The fastest players run underneath it so quickly that it can’t react in time. If you struggle with this, you can briefly hesitate to “bait” its drop, then jump over it.
- Consider the Silkspeed Anklets: While not required, the Silkspeed Anklets tool significantly increases your run speed. This makes dodging enemies easier (especially the first one) and can shorten the run back to about 30 seconds.
- Strategic Use of Your Cocoon: If you take damage on the way, don’t despair. Upon entering the arena, save the Silk Cocoon from your previous death. If you need an emergency heal during the fight, break the cocoon then for an instant full spool of Silk.
Loadouts & Preparation
Section titled “Loadouts & Preparation”Before the fight, it is highly recommended to get the Needle Upgrade from Pinmaster Plinney in Bellhart and craft any available health or silk upgrades.
We suggest two primary builds based on your preferred playstyle:
1. Patient, Ranged Build (High Safety)
Section titled “1. Patient, Ranged Build (High Safety)”This build focuses on staying at a safe distance, punishing slow attacks with tools, and prioritizing survival.
- Tools: Sting Shards / Throwing Knives (for ranged damage), Warding Bell (to block a hit), Druid’s Eye (for more healing opportunities).
- Crests: Hunter Crest (for increased tool speed and range).
2. Aggressive, Close-Range Build (High Damage)
Section titled “2. Aggressive, Close-Range Build (High Damage)”This build focuses on dealing maximum damage during openings and ending the fight quickly, with tools to mitigate damage.
- Ability: Threadstorm (to punish the boss when it gets close).
- Tools: Magma Bell (crucial for reducing fire damage in Phase 2), Fractured Mask (for an extra life), Longpin (deals extra damage to this hard-shelled boss), Magnetite Dice (for a chance to negate damage).
- Crest: Reaper Crest (for powerful, wide-arcing slashes).
How to Beat Last Judge
Section titled “How to Beat Last Judge”Fight Strategy
Section titled “Fight Strategy”This fight is a marathon, not a sprint. The Last Judge starts slow and becomes faster and more aggressive as its health lowers. The key is to learn its telegraphed attacks and only strike during recovery windows.
Do not get greedy. In Phase 1, focus on getting one or two hits in and then repositioning. The boss’s slow whip slam is your safest and most reliable window to heal or use a ranged tool. Always be aware of your position and never let it trap you in a corner. If you must take a hit to escape a corner, do it.
Attack Patterns & Counters
Section titled “Attack Patterns & Counters”The fight is divided into two main phases, with the boss adding fire to all its attacks in the second phase.
Phase 1 Attacks
Section titled “Phase 1 Attacks”The Judge leaps into the air and attempts to land directly on top of Hornet.
Counter: This is a simple attack to avoid. Dash in the direction it’s coming from if it’s close, or dash away if it’s far. The long recovery time after it lands is a great opportunity to attack.
The Judge throws its bell straight at Hornet and retracts it after a short delay.
Counter: Simply jump over the bell. The critical rule is: do not stand between the boss and the bell when it’s being retracted, as you will get hit on the way back.
The Judge spins its bell in a large circle around itself for a few seconds. This attack can shred your health if you’re caught inside.
Counter: As soon as you see it start circling the whip, dash backwards out of its range. Do not try to attack during this move.
Phase 2 Attacks (Fire Phase)
Section titled “Phase 2 Attacks (Fire Phase)”After taking enough damage, the bell will ignite, adding fire properties and new dangers to every attack.
The Judge slams its bell into the ground, causing a shockwave of fire to travel across the floor.
Counter: Dodge the initial slam as before, but now you must also jump over the shockwave.
The Judge spins its bell, creating arcs of fire that spread outwards. There are gaps between the fire waves.
Counter: This is your best window to deal damage in Phase 2. Stay relatively close and carefully move between the lines of fire. After the spin finishes, the boss is briefly stunned. Rush in for a few hits.
The Judge dashes across the arena, leaving a trail. Shortly after, pillars of fire erupt from that trail.
Counter: Jump over the initial dash, then quickly find a safe spot between where the pillars will erupt. Do not stay on its path.
When the Last Judge’s health reaches zero, it will fall to its knees and begin to glow before unleashing a massive final explosion.
Counter: The fight isn’t over when its health is gone. As soon as it kneels, dash away immediately to escape the blast radius.
Last Judge Drops & Rewards
Section titled “Last Judge Drops & Rewards”- Rewards: Unlocks the path to the Citadel.
- Drops: Rosaries, TBA.
Last Judge Lore
Section titled “Last Judge Lore”- The Last Judge acts as the final test for pilgrims attempting to enter the Citadel, a sacred place in Pharloom.
- Its use of a bell as a weapon connects it to the broader bell-related religion and culture seen throughout the kingdom.